
How do you quickly catch brainstorming ideas while producing a record that you can evaluate, modify, and act upon later? When you create a brainstorming( or mind map )diagram in Visio, you develop a visual archive of your concepts like the illustration below. The diagram can assist you rapidly acknowledge and order styles and hierarchies, making it a snap to pull a plan of action out of a chaotic idea-generating session.
This post describes 5 different methods to develop a conceptualizing diagram in Visio. Each method has its appeal, depending on how you like to work.
Using a conceptualizing diagram
There are 2 primary methods to utilize a conceptualizing diagram. The first is to start with a main idea and after that generate associated topics and subtopics hierarchically to arrive at a great deal of different possible techniques.
The 2nd is to capture all ideas as they are revealed and later on to arrange them in a hierarchical diagram. You then modify, fine-tune, and share the results among the members of the group. This approach is most beneficial during a brainstorming conference where people are contributing ideas in rapid succession. In this setting, hierarchies aren’t constantly obvious and you need to record concepts quickly.
Starting a new brainstorming diagram
-
Click File, and then click New.
-
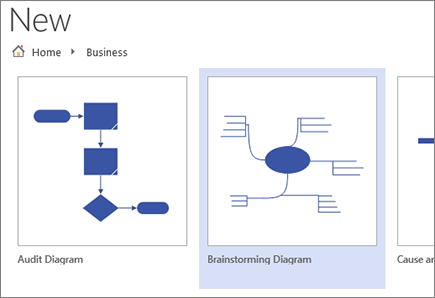
Under Business, click Brainstorming Diagram. If you do not see Business, click Design templates or Classifications.
Expand the drawing page to fit your brainstorming diagram If your brainstorming diagram extends beyond the borders of the drawing page, you can quickly expand the page without moving your topics to a different page. There are two ways to resize the page: by manually dragging the borders of the page or by
using the Page Setup dialog box. Resize the drawing
-
page by by hand dragging the borders On the View menu, click Zoom, andclick Entire Page. This view reveals you the borders of your drawing page.
-
Place the pointer on the border of the drawing page that you want to broaden, and then push the CTRL key. When the pointer changes to a two-headed arrow, drag the pointer to resize the page.
page by by hand dragging the borders On the View menu, click Zoom, andclick Entire Page. This view reveals you the borders of your drawing page.
Place the pointer on the border of the drawing page that you want to broaden, and then push the CTRL key. When the pointer changes to a two-headed arrow, drag the pointer to resize the page.
Resize the drawing page using the Page Setup dialog box Click
Design, and after that press Shift+F5 to open the, the Page Setup dialog
. Click the Page Size tab. Under Custom-made size, type the size you wish to page to be, and click OK.
Note: The changes to the size of the drawing page use just to the page you are presently viewing. Likewise, make sure that you type the right system of measurement (inches or millimeters) in the Custom size boxes when you are typing in the size of the page.
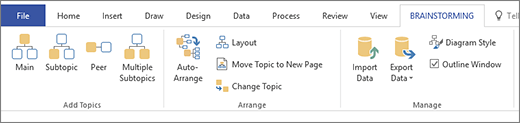
Utilizing the Conceptualizing ribbon
You can perform the most common jobs in constructing a brainstorming diagram, such as including a main topic or arranging topics on the page, by clicking buttons on the Brainstorming ribbon.
You can easily access these tools without dragging the pointer off the drawing page. For instance, if you are using a Tablet PC, you simply tap once on the Brainstorming ribbon to put subjects on the drawing page.
The Brainstorming ribbon offers you access to all the tools developed specifically for the Brainstorming design template. In addition to including or organizing topics, you can utilize commands on this ribbon to carry out such actions as altering the kind of an existing topic or moving a topic to a brand-new page.
Develop a diagram using the Brainstorming tab On the Brainstorming
tab, click Main. With the shape selected, type the text that you want the main point
to represent. With the Main Topic shape chosen, click Subtopic.
A subtopic links to and is subordinated to the primary subject.
Type the title of the subtopic.
Add more subjects using the Brainstorming toolbar
You can add more topics to your diagram by doing one of the following:
Include multiple subtopics
-
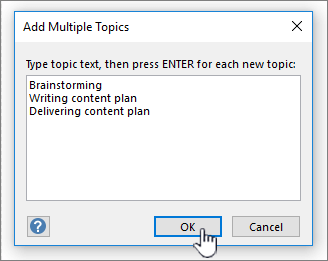
Select the subject you wish to include subtopics to, and after that, on the Brainstorming toolbar, click Several Subtopics.
-
In the dialog box, type the text for each new topic, and press GET IN after each one. When you are finished adding all the subjects that you desire, click OK.
Add a peer topic Select the topic you want to add a same-level subject to, and
then, on the Brainstorming
toolbar, click Peer. Type the
-
title of the topic. Include one subject at a time Select the subject that you wish to add a same-level subject or subtopic to, and then, on the Brainstorming toolbar,click
-
Peer or Subtopic.
Type the title of the subject
. Set up topics You can improve the look of your diagram and optimize the space on the drawing page by doing
the following: Pointer: You can manually organize topics by selecting the subjects that you want to move, and then dragging them to a different area on the page. When you move a topic, its ports reposition immediately and its subtopics move with it.
Utilizing the shortcut menu
In any Microsoft Workplace application, the faster way (or “right-click”) menu is a helpful tool to utilize when you want to rapidly perform an action without moving the cursor off the page. The shortcut menu also includes standard Visio drawing page commands for tasks such as copying and pasting shapes.
A lot of skilled users use the faster way approach since of its ease of access. In Visio, you can easily build your diagram using this method.
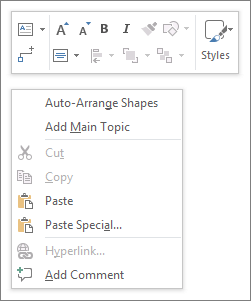
Produce a diagram using the shortcut method Right-click the drawing
page and click Include Main Topic. With the shape chosen, type the text that you want the essence
to represent. Right-click the Main Topic shape, and after that click Include Subtopic.
Type the title of the subtopic.
Include subjects utilizing the shortcut technique
There are a number of methods to add subjects to your diagram:
Include multiple subtopics
-
Right-click the subject you want to add several subtopics to, and then click Add Numerous Subtopics.

-
In the dialog box, type the text for each brand-new subject, and press ENTER after every one.
When you are finished adding all the topics
-
that you desire, click OK. Include a peer topic Right-click the subject that you wish to add a same-level subject to,
-
and click Add Peer Topic.
that you desire, click OK. Include a peer topic Right-click the subject that you wish to add a same-level subject to,
and click Add Peer Topic.
Type the text for the brand-new topic. Include
-
a subject at a time Right-click the subject that you wish to include a same-level topic or subtopic to, and click Include Peer Topic or Add Subtopic
-
. Type the title of the subject.
Organize topics
a subject at a time Right-click the subject that you wish to include a same-level topic or subtopic to, and click Include Peer Topic or Add Subtopic
. Type the title of the subject.
You can enhance the appearance of your diagram and optimize the space on the drawing page by doing the following:
Tip: You can manually set up topics by selecting the subjects that you wish to move, and then dragging them to a various area on the page. When you move a topic, its connectors rearrange immediately and its subtopics move with it.
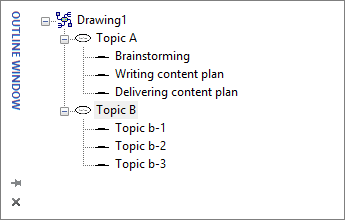
Utilizing the Summary Window
The Summary Window screens a tree structure of your brainstorming diagram, which captures the hierarchical relationships of the subjects and condenses all the details that is spread over multiple shapes and pages into one central location. Use the function when you wish to organize your ideas in a linear view without impacting the look of your diagram and without having to browse backward and forward between shapes and pages.
Turn Overview Window on or off To turn the Outline Window on or off, on the Brainstorming tab, check or uncheck
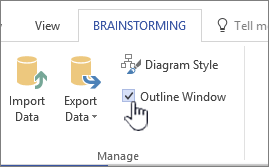
the Summary Window checkbox.
-
Produce a diagram utilizing the Outline Window In the Overview Window, right-click”Drawing1″or the saved drawing file name, and
-
then click Add Main Topic. Right-click Main Subject and select Rename
-
. Type the text you want the main idea to represent.
-
To include a subtopic, right-click the Main Subject (or any other subject), and then click Add Subtopic. Relabel the subtopic the exact same method you renamed your primary subject.
Produce a diagram utilizing the Outline Window In the Overview Window, right-click”Drawing1″or the saved drawing file name, and
then click Add Main Topic. Right-click Main Subject and select Rename
. Type the text you want the main idea to represent.
To include a subtopic, right-click the Main Subject (or any other subject), and then click Add Subtopic. Relabel the subtopic the exact same method you renamed your primary subject.
Idea: To erase topics, right-click a topic, and after that click Delete Topic. When you erase a topic with subtopics, all of the matching subtopics are likewise deleted. You can likewise erase a subject by choosing the subject that you wish to erase, and after that pressing the DELETE secret.
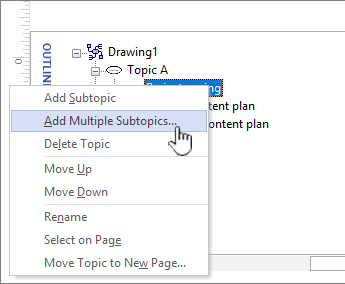
Include more subjects to your diagram using the Summary Window
To include more topics in the Summary Window, right-click the subject that you wish to include more topics to, and after that click Include Multiple Subtopics. In the Include Numerous Subtopics dialog box, type the names of the subjects, and after that click OK.
Change a subject into a subtopic Because the Overview Window shows subjects in a linear view, you can utilize it to control the hierarchical structure of your subjects. In the Summary Window, you can make a topic into another subtopic by dragging
the name of the topic to a different level. If you wish to move a subtopic to a higher level(or lower level) within the hierarchy, drag the name of the subtopic on top of the higher-level subject (or lower level subject). If the subtopic you moved has corresponding subtopics, they also move with it and the modifications are reflected in your diagram
. Note: Promoting or demoting a topic in the hierarchy utilizing the Outline Window
immediately changes the structure of your diagram. Move a subject
up or down within the Outline Window You can arrange or prioritize subjects in the Summary Window without affecting the structure of your diagram. For instance, if you want to focus on topics, you can move the topics with greater top priority to the leading area of the Summary Window— the plan of shapes on the page will stay the very same.
-
Right-click the topic that you wish to move, and after that click Move Up or Move Down.
This modification is reflected just in the Outline Window. The subject position in your diagram stays the same.
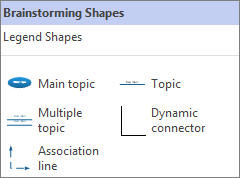
Using the Brainstorming Shapes
Dragging shapes from the Brainstorming Shapes stencil offers you the most control over the position of your topics on the drawing page and their kind of connection.
Keep in mind: Due to the fact that this method does not take advantage of the Brainstorming template’s automated features, when you use it the Auto-Arrange command and Overview Window might not always offer you the results you expect.
Produce a diagram by
-
dragging shapes onto the drawing page From the Brainstorming Shapes stencil, drag the Main subject shape onto
-
the drawing page. Type the text that you want the primary topic
-
to represent. To add a subtopic, drag the Topic shape to the page. With the Topic shape selected, type the name of the subject.
-
You can add multiple subjects and subtopics by dragging the Numerous subject shape onto the page. In the dialog box, type the name of the topics, and then click OK.
Before you connect shapes: comprehend connection types
Topics do not instantly connect when you drag them from the Brainstorming Shapes stencil, so it is a great idea to comprehend how adapters work in Visio.
Visio includes 2 techniques for linking subjects in your diagram: shape-to-shape and point-to-point. Each approach is created for particular circumstances and the method you need to utilize depends upon how fixed you want the real point of connections to be.
Shape-to-shape
When you move shapes that are linked shape-to-shape, the ports rearrange themselves to keep the connection as direct as possible. If you want a shape-to-shape connection, drag completions of the port line to the center of the shape until a red box surrounds the topic shape.

Point-to-point When a connection is point-to-point, completions of the adapter are glued to particular points on each shape. If you desire a point-to-point connection, drag the ends of the adapter line to a point on the shape till a red X appears. If you move the shapes, the adapter stays connected at those original points.
Recognize the connection type To see whether a connection is shape-to-shape or point-to-point, click the
adapter to pick it. If the ends of the connector become large red squares, the connection is shape-to-shape. If completions end up being little red squares with
signs in them (x or + ), the connection is point-to-point
. Change one kind of connection to another To change a shape-to-shape connection to point-to-point, drag a connector endpoint away from the shape, and then drag it back to the connection point, marked with a blue x, where you desire it to link to the shape. To change a point-to-point connection to shape-to-shape, drag an adapter endpoint over the procedure step shape up until a red box surrounds the whole shape.
Link topics Drag the Dynamic adapter from the Brainstorming Shapes stencil onto a blank area on the page.
Drag one end of the adapter line to the center of the very first shape that you want to connect up until the subject shape is surrounded by a red box.
Drag the other end of the connector line to the center of the 2nd shape that you wish to connect till it too is surrounded by a red box.
When you launch the mouse and select the port, each endpoint appears as solid red square, which indicates the shapes are

connected correctly. Program associations between topics
You can reveal a special relationship in between 2 topics in your conceptualizing diagram utilizing an Association line, which appears as a rushed line in between involved subjects. Unlike the Dynamic port, which defines the main structure of your diagram, the Association line links subjects on various branches at the same (hierarchical) level.
The Association line is a visual hint only and is not consisted of in the hierarchy of your diagram. The Outline Window does not show the association in between the topics.
You can connect topics using an Association line shape the exact same way you use the Dynamic adapter. When you link topics using the Association line, it reroutes with the topics when you move them.
See Also
Create a conceptualizing diagram
Learn how to tape-record and track fantastic brainstorming sessions utilizing Visio Brainstorming diagrams.


