

< img src=" https://support.content.office.net/en-us/media/69b6c2f4-aa60-4951-aa6d-5e0f6fc9f122.png"> A SmartArt graphic is a visual representation of your information and ideas. You create one by selecting a design that fits your message. Some designs( such as organization charts and Venn diagrams )depict specific type of information, while others merely improve the appearance of a bulleted list. Integrated with other functions such as themes, SmartArt graphics assist you develop designer-quality illustrations with only a few clicks of your mouse.
In this article:
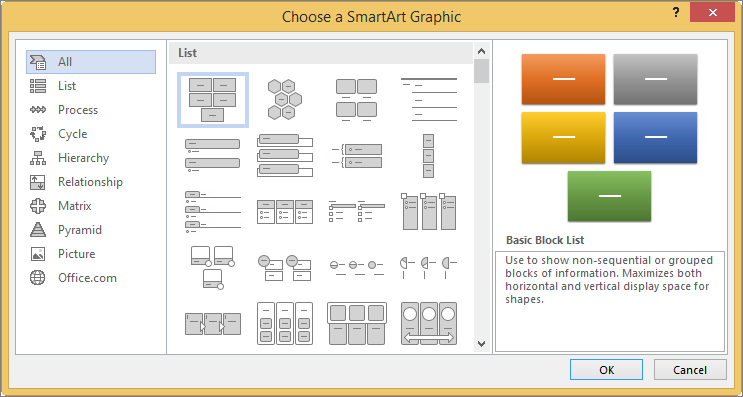
Summary of SmartArt graphics
You can create a SmartArt graphic in Excel, PowerPoint, Word, or in an e-mail message in Outlook. The SmartArt button is on the Insert tab, and, depending on your screen size, might look like any of the following:


Other Workplace programs do not
enable SmartArt graphic production, however you can copy and paste SmartArt graphics as images into those programs. You can change the look of your SmartArt graphic by altering the fill of its shape or text; by adding effects, such as shadows, reflections, glows, or soft edges; or by including three-dimensional(3-D)results, such as bevels or rotations.
You can find out much more about dealing with SmartArt graphics by reading the related info listed at the bottom of this short article.
What to consider when choosing a layout
When you choose a design for your SmartArt graphic, ask yourself what you want to convey and whether you want your information to appear a particular way. As part of this procedure, when you create a SmartArt graphic, you are triggered to select a type such as Process, Hierarchy, or Relationship. A type resembles a classification of SmartArt graphic, and each type consists of several different layouts.
Since you can rapidly and easily change designs, attempt different layouts (from various types) till you find the one that best highlights your message.
The table listed below lists examples of a few typical uses for SmartArt graphics, and the best SmartArt types to consider for each
use. To do this Use
this type
Program non-sequential details.
List
Program steps in a process or timeline.
Process
Show a continual process.
Cycle
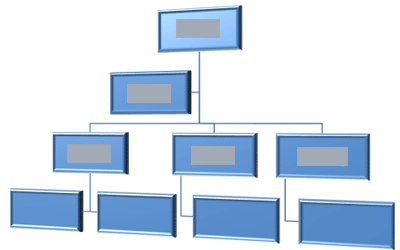
Produce a company chart.
Hierarchy
Program a choice tree.
Hierarchy
Illustrate connections.
Relationship
Demonstrate how parts associate with a whole.
Matrix
Usage images to communicate or accent material.
Picture
Show proportional relationships with the largest component on the top or bottom.
Pyramid
For more guidance on choosing the right SmartArt graphic layout, along with more information about each layout type, see Select a SmartArt graphic.
About the Text pane
Utilize the Text pane to enter and edit the text that appears in your SmartArt graphic. The Text pane appears to the left of your SmartArt graphic. As you include and edit your content in the Text pane, your SmartArt graphic is immediately updated — shapes are included or removed as needed.
When you create a SmartArt graphic, the SmartArt graphic and its Text pane are populated with placeholder text that you can change with your information. At the top of the Text pane, you can edit the text that will appear in your SmartArt graphic. At the bottom of the Text pane, you can read a description of the SmartArt
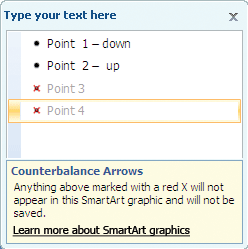
graphic. In SmartArt graphics which contain a set number of shapes, just some of the text in the Text pane appears in your SmartArt graphic. Text, pictures, or other content that is not shown is recognized in the Text pane with a red X. This content is still readily available if you change to another layout, however if you keep and close this very same layout, the information is not saved, to secure your personal privacy.
The Text pane works like a summary or a bulleted list that maps info directly to your SmartArt graphic. Each SmartArt graphic defines its own mapping in between the bullets in the Text pane and the set of shapes in the SmartArt graphic.
To create a brand-new line of bulleted text in the Text pane, press Go into. To indent a line in the Text pane, pick the line that you wish to cave in, and then under SmartArt Tools, on the Style tab, click Demote. To negatively indent a line, click Promote. You can also push Tab to cave in or Shift+Tab to adversely cave in from within the Text pane.
If you do not see the SmartArt Tools or Style tabs, double-click the SmartArt graphic.
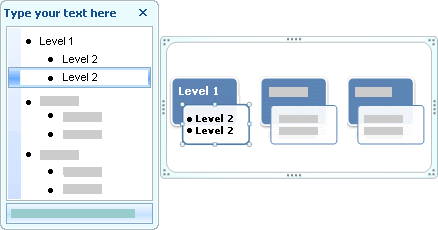
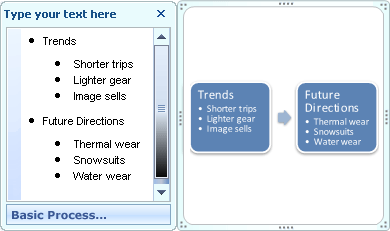
Depending upon the layout that you select, each bullet in the Text pane is represented in the SmartArt graphic as either a new shape or a bullet inside a shape. For example, observe how the very same text is mapped in a different way in the 2 SmartArt graphics below. In the very first example, the sub-bullets are represented as different shapes. In the 2nd example, the sub-bullets are represented as bullets in the shape.

Tip: If you do not want all of your text in different shapes, switch to a various design that reveals all of the text as bullets.
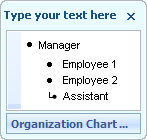
If you utilize an organization chart design with an Assistant shape, a bullet with a line connected shows the Assistant shape. You can apply character formatting, such as typeface, font style size, vibrant, italic, and underline, to the text in your SmartArt graphic by applying the formatting to text in the Text pane, and it is shown in your SmartArt graphic. When the typeface size in one shape diminishes due to the fact that you add more text to the shape, all of the other text in the remaining shapes of the SmartArt graphic will likewise shrink to the exact same size to keep the SmartArt graphic looking consistent and expert.
After you pick a layout, you can move your mouse pointer over any of the different layouts displayed on the Design tab, and use Live Preview to see what your content will appear like with that design applied.
Design, color, and results for SmartArt graphics
Under SmartArt Tools, on the Design tab, there are two galleries for quickly altering the appearance of your SmartArt graphic: SmartArt Styles and Change Colors.
SmartArt Styles consist of shape fills, edges, shadows, line designs, gradients, and three-dimensional (3-D) point of views and are used to the entire SmartArt graphic. You can likewise use a private Forming style to one or more shapes in your SmartArt graphic.
The second gallery, Modification Colors, provides a series of different color alternatives for a SmartArt graphic, each one using several theme colors in a various method to the shapes in your SmartArt graphic.
When you rest your pointer over a thumbnail in either of these galleries, you can preview how a SmartArt Design or color variation affects your SmartArt graphic before you in fact apply it.
SmartArt Styles and color mixes are designed to highlight your material. For instance, if you utilize a 3-D SmartArt Style with viewpoint, you can see everybody on the same level.
You can likewise use a 3-D SmartArt Design with point of view to emphasize a timeline that goes into the future. Idea: 3-D SmartArt Styles, specifically scene-coherent 3-D, are best utilized sparingly, to avoid diversion from the message that you want to convey. 3-D SmartArt Styles often work well for the first page of a document or the very first slide of a discussion. To emphasize distinct actions in a SmartArt graphic of the Process type, you can utilize any of the mixes under Colorful. If you have a SmartArt graphic of the Cycle type, you can use any of the Accent options to emphasize the circular movement. These colors move along
a gradient to the middle shape and then reverse to the first shape. When selecting colors, you need to likewise think about whether you want your audience to print your SmartArt graphic or see it online.
Suggestion:If an image is part of your background slide, color combinations with Transparent in the name work best to show off a more refined style in your file.
When you place a SmartArt graphic into your file without defining a theme, the graphic style matches that utilized by the rest of the material in your document. If you alter the style of the file, the look of the SmartArt graphic is updated instantly.
Almost all parts of a SmartArt graphic are personalized. If the SmartArt Style gallery does not have the mix of fills, lines, and effects you desire, you can apply an individual Shape style or completely customize the shape yourself. You can also move shapes around and resize them. You can find most of the modification alternatives under SmartArt Tools on the Format tab.
Even after you customize your SmartArt graphic, you can change to a different design, and the majority of your modifications will be kept. Or to remove all formatting and begin over, on the Style tab, in the Reset group, click Reset Graphic.

Animation for SmartArt graphics
In PowerPoint, you can include animation to your SmartArt graphic, or to a specific shape in a SmartArt graphic. For example, you can make a shape fly in quickly from one side of your screen or slowly fade in.
The animations that are available depend upon the layout that you choose for your SmartArt graphic, however you can constantly stimulate all of the shapes at once or one shape sometimes.
Discover more about animation by checking out Animate your SmartArt graphic.
See Likewise
Select a SmartArt graphic
Produce a SmartArt graphic
Animate your SmartArt graphic
Restore the default layout and color of your SmartArt graphic
How you can rapidly develop graphes of your details and ideas in Microsoft 365.


